Creating personalized resin keepsake gifts at home is a rewarding and enjoyable way to commemorate special memories. Resin gifts are not only beautiful but also durable, making them perfect for preserving cherished moments. Whether you are a beginner or an experienced crafter, this guide will walk you through the process of making your own resin keepsake gifts.
In this article, we will cover everything from the materials you need to the step-by-step process of creating your unique memory gifts. Let's dive in!
Why Choose Resin Keepsake Gifts?
Resin keepsake gifts are becoming increasingly popular for several reasons. Here are a few:
- Durability: Resin is a strong and long-lasting material that can withstand the test of time.
- Versatility: You can create a wide variety of items, from jewelry to paperweights, coasters, and more.
- Personalization: Resin allows you to encapsulate personal items like photos, dried flowers, and small trinkets, making each piece unique and meaningful.

Materials Needed
Before you start crafting, gather the following materials:
- Epoxy Resin: Ensure you choose a high-quality, clear epoxy resin.
- Hardener: This is usually sold with the epoxy resin and is necessary for the curing process.
- Molds: Silicone molds work best as they are flexible and make it easier to remove the finished product.
- Mixing Cups and Sticks: Use disposable ones to avoid a messy cleanup.
- Personal Items: Photos, dried flowers, small trinkets, or any other items you want to encapsulate.
- Protective Gear: Gloves, mask, and safety glasses to protect yourself from the chemicals.
- Tweezers: For placing small items accurately.
- Heat Gun or Torch: To remove air bubbles from the resin.
Step-by-Step Guide to Making Resin Keepsake Gifts
Step 1: Prepare Your Workspace
Set up a well-ventilated workspace and cover your working area with plastic or newspaper to protect it from spills. Make sure you have all your materials within reach.
Step 2: Mix the Resin and Hardener
Follow the instructions on the epoxy resin package to mix the resin and hardener. Typically, you will mix equal parts of both substances. Stir the mixture slowly to avoid creating too many air bubbles.
Step 3: Pour the Resin into the Mold
Pour a small amount of the resin mixture into your silicone mold. This will be the base layer. Allow it to sit for a few minutes to let any air bubbles rise to the surface.
Step 4: Place Your Personal Items
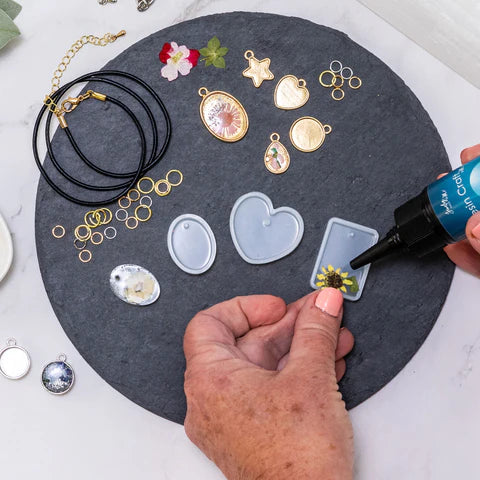
Using tweezers, carefully place your personal items into the mold. Arrange them as you like, keeping in mind that the resin will magnify the appearance of the objects.
Step 5: Add More Resin
Pour additional resin over your personal items until the mold is filled to the desired level. Use a heat gun or torch to remove any air bubbles that form.
Step 6: Let It Cure
Allow the resin to cure according to the manufacturer's instructions. This usually takes 24-48 hours. Ensure the mold is in a dust-free environment to avoid particles settling on the surface.
Step 7: Demold Your Keepsake
Once the resin has fully cured, carefully remove the keepsake from the mold. If it's difficult to remove, gently flex the silicone mold or use a release agent.
Step 8: Finishing Touches
Inspect your keepsake for any sharp edges or imperfections. You can sand down rough spots with fine-grit sandpaper. Optionally, you can apply a clear resin top coat for extra shine and protection.
Tips for Perfect Resin Keepsake Gifts

Choose the Right Mold
Selecting the right mold is crucial for achieving the desired shape and size. Silicone molds come in various shapes and designs, so choose one that best suits your project.
Avoid Air Bubbles
Air bubbles can ruin the appearance of your resin keepsake. To minimize bubbles, stir the resin mixture slowly and use a heat gun or torch to pop any that rise to the surface.
Work in Layers
For larger items, consider working in layers. Pour a base layer of resin, let it cure partially, then add your personal items and more resin. This method helps to reduce air bubbles and ensures that items stay in place.
Creative Ideas for Resin Keepsake Gifts
Resin Jewelry
Create beautiful resin jewelry by encapsulating small flowers, glitter, or tiny photos in pendant molds. These make great personalized gifts for friends and family.
Photo Frames
Preserve your favorite memories by embedding photos in resin photo frames. You can add decorative elements like dried flowers or beads to enhance the look.
Coasters
Make custom coasters by embedding small items like seashells, leaves, or even fabric pieces in resin. These functional items add a personal touch to any home.
Paperweights
Create unique paperweights by embedding meaningful objects such as coins, buttons, or small figurines. These make thoughtful gifts for colleagues or loved ones.
Conclusion
Crafting personalized resin keepsake gifts at home is a fulfilling and creative way to preserve cherished memories. By following this guide and using high-quality materials, you can create beautiful and durable keepsakes that will be treasured for years to come.
Whether you are making jewelry, photo frames, coasters, or paperweights, the possibilities are endless with resin crafting. So gather your materials, set up your workspace, and start creating your own unique memory gifts today!
Shop DIY Resin Kits at Jewelry Made By Me!
Ready to embark on your resin crafting journey? Visit Jewelry Made By Me to explore our specially curated DIY resin kits. Each kit includes all the essential materials you need to create stunning resin keepsake gifts, from jewelry to coasters and more. With high-quality components and easy-to-follow instructions, you’ll be well on your way to crafting beautiful, personalized treasures. Don’t wait any longer—start creating memories today by shopping our DIY resin kits!


